
Share This Blog With Other Pet Parents!
Safe Ear Cleaning for Dogs: A Step-by-Step Guide
Many pet owners face the challenge of keeping their dogs’ ears clean, fearing they might harm their beloved pets or miss the signs of underlying issues. This article will guide you through the safest techniques to clean your dog’s ears at home, helping you prevent infections and maintain your pet’s ear health without causing discomfort.
With expert advice and simple steps, you’ll learn how to confidently manage this crucial aspect of your dog’s hygiene, ensuring their ears are clean, healthy, and infection-free.
What you’ll learn from this blog:
For all you need to know, download our
FREE Dental Guide
![]()
This blog is part of our Proactive Pet Parent series! This is just the beginning… To see more blogs, click here! Better yet, sign-up to our newsletter to receive these directly to your inbox each month.
Sign-up To The Proactive Pet Parent Newsletter
Understanding Dog Ear Anatomy and Health
To safely clean your dogs ears, an understanding of dogs’ ear anatomy and the impact on overall health is very important. Dogs’ ears are more complex than many pet owners realise, consisting of three parts: the outer ear, middle ear, and inner ear.
This structure makes them particularly susceptible to infections and debris build up. Unlike human ears, a dog’s ear canal is L-shaped, creating a hospitable environment for bacteria and yeast when moisture or dirt becomes trapped. Regular and careful cleaning is vital to prevent these common issues, ensuring your pet remains comfortable and healthy.
The Signs of Ear Problems in Dogs
Identifying the signs of ear problems in dogs early on is essential for preventing more serious health issues. Dogs with ear discomfort may exhibit behaviours such as scratching at their ears, shaking their head frequently, or tilting their head to one side. Visible signs include redness inside the ear, an unusual amount of wax, or a foul odour emanating from the ear canal. In more advanced cases, you might notice swelling, discharge that can be yellow, brown, or bloody, and even signs of pain when the ear area is touched.
These symptoms can indicate a range of issues from mild irritations to severe infections. If you suspect your dog may have an ear issue, it will require prompt veterinary attention. Ignoring these signs can lead to complications, including hearing loss or more systemic problems.
Preparing for Ear Cleaning
Before diving into the ear cleaning process, setting up a calm and prepared environment is key to a stress-free experience for both you and your pet. Start by choosing a quiet, well-lit area where your dog feels comfortable and secure. Gather all necessary supplies beforehand, including a veterinarian-approved ear cleaning solution, cotton balls or gauze, and treats to reward your pet for their cooperation. Avoid using cotton swabs, which can push debris further into the ear canal or damage the delicate structures inside the ear.
Familiarise your dog with the cleaning supplies by letting them sniff and investigate the items. This can help reduce any anxiety or surprise when these items are used. Gently pat and talk to your dog to keep them calm and relaxed before starting the cleaning process. If your dog is particularly nervous or uncooperative, consider having another person help by gently holding them still and offering comfort and reassurance.
Knowing your dog’s tolerance level is crucial; never force the cleaning if they become overly stressed or aggressive. In such cases, it’s best to pause and try again later, or consult a veterinarian for advice.
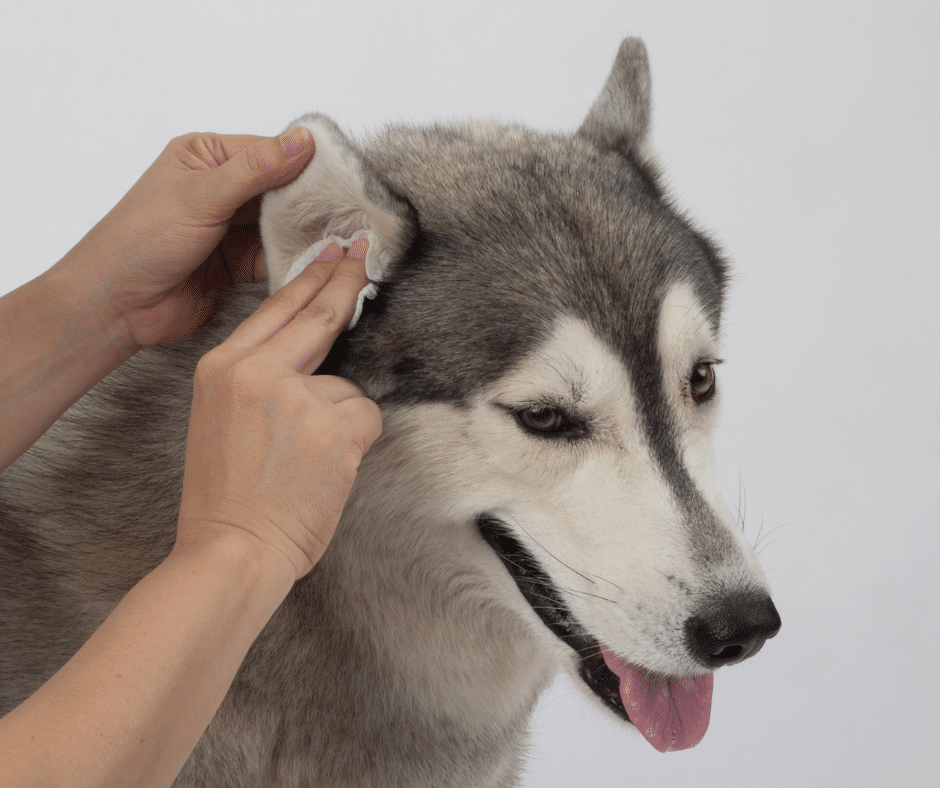
Step-by-Step Guide to Safely Cleaning Your Dog’s Ears
Cleaning your dog’s ears is an essential part of their grooming routine. Here’s a straightforward approach to ensure the process is both safe and effective.
- Inspect the Ear: Begin by gently folding back the ear flap to expose the inner ear. Look for any signs of infection, irritation, or unusual discharge. If you notice any alarming signs, consult a vet before proceeding.
- Apply Cleaning Solution: Fill the ear canal with a vet-approved ear cleaning solution. Avoid inserting the bottle tip directly into the ear canal to prevent contamination or damage.
- Massage the Base of the Ear: Gently massage the base of the ear for about 20-30 seconds. You should hear a squishing sound, indicating the solution is loosening debris and wax.
- Wipe Away Debris: Allow your dog to shake their head. This helps bring softened wax and debris to the outer part of the ear canal. Then, using a cotton ball or gauze, gently wipe away the loosened material. Avoid going deeper into the ear canal than your finger can easily reach.
- Reward Your Dog: After cleaning, offer plenty of praise and a treat. This positive reinforcement helps your dog associate ear cleaning with a positive experience.
Never use cotton swabs or forceful methods to clean your dog’s ears, as these can cause injury or worsen any existing conditions. Regular cleaning, when done correctly, can prevent many common ear problems and keep your dog comfortable and healthy.
Choosing the Right Ear Cleaning Solutions
Selecting an appropriate ear cleaning solution is very important to ensure the safety of your pet and their ears. Not all solutions are created equal, and using the wrong type can lead to irritation or exacerbate existing conditions. Look for solutions specifically formulated for dogs, as their pH levels and ingredients are designed to be gentle on a dog’s sensitive ear canal.
Avoid products containing alcohol or hydrogen peroxide, as these can cause burning and irritation, especially if the ear is already inflamed or has open sores. Instead, opt for solutions with antimicrobial properties and ingredients that soothe and moisturise, such as aloe vera or glycerin. These ingredients help in maintaining the natural balance of the ear environment while effectively cleaning.
Consulting with a veterinarian is always recommended when choosing an ear cleaning solution. They can provide recommendations based on your dog’s specific needs, especially if your dog has a history of ear problems. A veterinarian can advise on the frequency of ear cleaning required for your dog’s health and comfort, helping to prevent over-cleaning, which can disturb the natural flora of the ear and lead to further issues.
Aftercare and Monitoring
After cleaning your dogs ears, observing your dog’s behaviour and ear condition in the following days is very important for ensuring their well-being. Monitoring for any signs of irritation, such as increased scratching, redness, or discharge, is essential. If any adverse reactions occur, phone your nearest MustCare Vets Centre so we can help you address potential complications promptly.
As for the frequency of ear cleaning, it varies depending on your dog’s breed, activity level, and ear health history. Generally, a monthly cleaning is sufficient for most dogs. However, dogs with floppy ears, those that swim frequently, or those prone to ear infections may require more frequent cleanings. It’s important to strike a balance; over-cleaning can disrupt the natural ecosystem of the ear, leading to irritation or infection, while under-cleaning can allow wax and debris to accumulate, causing discomfort and potential health issues.
Always use a veterinarian-recommended solution and follow the vet’s advice on how often to clean your pet’s ears, tailored to their specific needs. If you need further information on cleaning your dog’s ears, contact your nearest MustCare Vet Centre.

